Emergency Preparedness Carnival


:max_bytes(150000):strip_icc():format(webp)/what-is-rice-190446_FINAL-5bc5fcebc9e77c005135258d.png)
We invited the whole neighborhood with flyers and were really surprised to see a lot of people we didn't know! The event was also very well attended and exceptionally well-received by ward members.
We had people sign in at the ticket booth and gave each family a grab-and-go binder. The binders all had a colored ticket taped to them with a station number on it that corresponded to the number of the station where they were supposed to start.
We had 5 stations and people rotated through them in order. Each station had a 5-minute presentation and a 10-minute hands-on activity associated with it.
We used a mic to give a 1-minute warning that it was time to rotate and then played carnival music during the transition time.
We had people pick up a carnival treat (e.g., popcorn, snow cones, cotton candy, etc.) on their way to their next station (as the reward for completing the task at the previous station).
Stations were:
1) Grab-and-go Binder - Learn the importance of having a grab-and-go binder and then fill out family information sheets for each family member including their fingerprints. We had a separate backpack tag making station where kids filled out their name, address, and phone number on a tag that they decorated for their school backpacks and learned to call 911 for help) - popcorn for the treat
Contains 8 tabbed sections:
1) Emergency Plan (Evacuation plan, grab and go list, utilities shutoff information)
2) Family Member Details (separate sheets for each adult, child, and pet in the family)
3) Emergency Contacts (Contacts for emergency services, out of town emergency contacts, emergency babysitters, and friends and family)
4) Finances (Bank accounts, debit/credit cards, investments, loans, and retirement)
5) Insurance Information (Auto, health, life, and home)
6) Accounts/Passwords
7) Legal Documents (Deeds, titles, medical power of attorney, wills)
8) Planning & Information (A section for storing emergency prep handouts
The color-coded arrows on the floor led people to the cooking station in the kitchen and adjoining classrooms.
2) Cooking - Learn ways to cook without power (dutch ovens, jetboil stoves, etc.) and then taste and rate 4 different MRE samples as the activity/treat based on qualities like appearance, smell, texture, and flavor. Rating sheets got added to the emergency prep info. section of the binders for future reference (in case the family decided to purchase MREs, they would know which ones they liked).
3) Communication - Learn ways to communicate without cell phones and play with walkie talkies and Morse code for the activity (snow cones as the treat) - Ham radio and morse code sheets got added to the emergency prep section of the binders
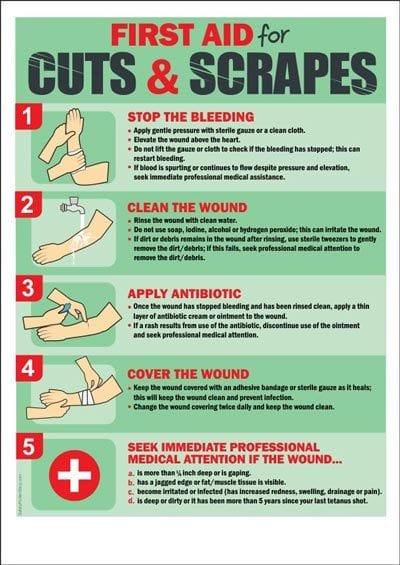
4) First Aid - Learn to use your DIY first aid kit to provide basic wound care. A nurse in the ward taught people how to use items typically found in a first aid kit to treat common issues like bites, burns, cuts, sprains, and stings. Children went to a separate room to learn how to care for cuts and scratches. The station facilitator read the children's picture book All Better about taking care of wounds. The facilitator used a red washable marker to give volunteers an "owie" that they then "treated" based on what they had learned (they practiced cleaning, disinfecting, and bandaging the wound). We had back up "roll and draw a first aid kit" games as well. Handouts got added to the emergency info. section of the binders.
We premade a bunch of the cotton candy and put it in bags for distribution during the transition times.
5) Shelter - We set up a couple of inexpensive tents ($10 tube tent and a $24 tent from WalMart). The children loved sitting in and playing in the various tents we had set up around the Primary room. They don't look pretty, but they helped people to think about the need for something more substantial than just lightweight plastic in an emergency. People learned about shelter and then learned to tie a few basic knots for the activity (which everyone really enjoyed and children continued to practice at home). We didn't serve a treat at this station because people needed both hands to tie the knots.
Note the green arrows that send people to the correct room. We originally intended to have relevant items displayed on each of these tables, but since we have been setting up displays every Sunday about different focus areas each week, we decided against it.
We had people sign in at the ticket booth and gave each family a grab-and-go binder. The binders all had a colored ticket taped to them with a station number on it that corresponded to the number of the station where they were supposed to start.
We had 5 stations and people rotated through them in order. Each station had a 5-minute presentation and a 10-minute hands-on activity associated with it.
We used a mic to give a 1-minute warning that it was time to rotate and then played carnival music during the transition time.
We had people pick up a carnival treat (e.g., popcorn, snow cones, cotton candy, etc.) on their way to their next station (as the reward for completing the task at the previous station).
Stations were:
1) Grab-and-go Binder - Learn the importance of having a grab-and-go binder and then fill out family information sheets for each family member including their fingerprints. We had a separate backpack tag making station where kids filled out their name, address, and phone number on a tag that they decorated for their school backpacks and learned to call 911 for help) - popcorn for the treat
Contains 8 tabbed sections:
1) Emergency Plan (Evacuation plan, grab and go list, utilities shutoff information)
2) Family Member Details (separate sheets for each adult, child, and pet in the family)
3) Emergency Contacts (Contacts for emergency services, out of town emergency contacts, emergency babysitters, and friends and family)
4) Finances (Bank accounts, debit/credit cards, investments, loans, and retirement)
5) Insurance Information (Auto, health, life, and home)
6) Accounts/Passwords
7) Legal Documents (Deeds, titles, medical power of attorney, wills)
8) Planning & Information (A section for storing emergency prep handouts
The color-coded arrows on the floor led people to the cooking station in the kitchen and adjoining classrooms.
2) Cooking - Learn ways to cook without power (dutch ovens, jetboil stoves, etc.) and then taste and rate 4 different MRE samples as the activity/treat based on qualities like appearance, smell, texture, and flavor. Rating sheets got added to the emergency prep info. section of the binders for future reference (in case the family decided to purchase MREs, they would know which ones they liked).
3) Communication - Learn ways to communicate without cell phones and play with walkie talkies and Morse code for the activity (snow cones as the treat) - Ham radio and morse code sheets got added to the emergency prep section of the binders
4) First Aid - Learn to use your DIY first aid kit to provide basic wound care. A nurse in the ward taught people how to use items typically found in a first aid kit to treat common issues like bites, burns, cuts, sprains, and stings. Children went to a separate room to learn how to care for cuts and scratches. The station facilitator read the children's picture book All Better about taking care of wounds. The facilitator used a red washable marker to give volunteers an "owie" that they then "treated" based on what they had learned (they practiced cleaning, disinfecting, and bandaging the wound). We had back up "roll and draw a first aid kit" games as well. Handouts got added to the emergency info. section of the binders.
We premade a bunch of the cotton candy and put it in bags for distribution during the transition times.
5) Shelter - We set up a couple of inexpensive tents ($10 tube tent and a $24 tent from WalMart). The children loved sitting in and playing in the various tents we had set up around the Primary room. They don't look pretty, but they helped people to think about the need for something more substantial than just lightweight plastic in an emergency. People learned about shelter and then learned to tie a few basic knots for the activity (which everyone really enjoyed and children continued to practice at home). We didn't serve a treat at this station because people needed both hands to tie the knots.
Note the green arrows that send people to the correct room. We originally intended to have relevant items displayed on each of these tables, but since we have been setting up displays every Sunday about different focus areas each week, we decided against it.